User Acceptance Testing: A Practitioner's Guide for 2026
User acceptance testing (UAT) is the phase where real business users — not engineers — validate that a software release actually does what the business needs before it ships to production. It is the last formal checkpoint in the software delivery lifecycle, and the one most likely to surface gaps that automated tests and QA regression cycles cannot see: workflows that work technically but break the way the business actually operates, edge cases only a domain expert would think to try, and assumptions baked into the requirements that turned out to be wrong.
Done well, UAT is the difference between a launch that ships and a launch that ships and holds. Done poorly, it becomes a rubber-stamp meeting that delays the release without catching anything real.
Key takeaways
- UAT validates business fit, not code correctness. Its question is "does this do what we need?" — not "does this run without errors?"
- The right testers are end users and business owners, not the QA team. Mixing experienced power users with newer users surfaces both workflow logic gaps and usability blind spots.
- Agile has not killed UAT — it has fragmented it. Continuous-deployment teams run smaller, sprint-scoped acceptance cycles rather than a single pre-launch event, but the sign-off requirement has not disappeared.
- Bug-report quality is the silent failure mode. Non-technical testers know something is wrong but rarely write reports developers can act on. Closing that gap is the single highest-leverage fix in any UAT program.
- Sign-off should be a defined decision against explicit exit criteria — not a conversation that ends with "yeah, looks fine."
What is user acceptance testing?
User acceptance testing is a formal validation phase in which actual end users, business stakeholders, or client representatives exercise a software system against agreed business requirements to confirm it is fit for release. The ISTQB glossary defines acceptance testing as "formal testing with respect to user needs, requirements, and business processes conducted to determine whether or not a system satisfies the acceptance criteria." That definition is worth pinning down because the term gets used loosely in practice.
UAT is sometimes labelled end-user testing, application testing, or business acceptance testing. The label varies — the intent does not. The phase exists to answer a single question: does the software do what the business needs it to do?
UAT sits at the end of the V-model, after unit testing, integration testing, system testing, and QA regression have all been completed. Even in continuous-delivery shops that no longer recognise distinct "phases," some equivalent of acceptance validation still gates the release. The conversation has shifted from when to do UAT to how to do it without becoming the release bottleneck.
UAT vs QA testing: the distinction that matters
The most common UAT failure mode is confusing it with QA testing. The two phases look superficially similar — both involve someone running through scenarios and logging defects — but they exist for different reasons and surface different defects.
QA testing is technically focused. QA engineers write structured test cases against functional, performance, and edge-case behaviour. They confirm the system works correctly. Their training and tooling are oriented around finding code defects, regression risks, and integration failures.
UAT is business focused. Acceptance testers are not asking whether the code is correct — they are asking whether the system supports their actual work. A QA engineer might verify that the "submit invoice" button returns a 200 status on valid input. A UAT tester verifies that an accounts payable clerk can move an invoice from receipt to payment approval in fewer steps than the old system required, the way they would on a typical Tuesday morning.
| UAT | QA testing | |
|---|---|---|
| Who tests? | Business users, end users, client reps | QA engineers and testers |
| Primary question | Does this meet our business needs? | Does this behave correctly under all inputs? |
| Defect type surfaced | Workflow gaps, usability issues, requirement misses | Functional defects, regressions, edge cases |
| Test case style | Plain-language scenarios | Structured, technical steps |
| Environment | Production-like staging | Multiple — dev, staging, automated CI |
| Timing | Before sign-off and go-live | Throughout development |
| Pass criteria | Acceptance criteria met, sign-off granted | All test cases pass, no critical defects |
Running QA staff as your UAT testers defeats the purpose. They will validate the system the way they have been trained to — against test cases — not the way a domain expert will actually use it.
UAT vs alpha vs beta testing
Three release-readiness phases get tangled in the literature: UAT, alpha testing, and beta testing. They sit at different points in the lifecycle and answer different questions.
Alpha testing is the first user-facing round of testing, conducted internally by employees of the company building the software — often a mix of QA, developers, and selected staff outside the immediate project. The environment is controlled, the audience is small, and the goal is to flush out show-stoppers — crashes, performance failures, and major workflow bugs — before any external party sees the build.
UAT comes after alpha. It is run in a production-like staging environment by business stakeholders or client representatives whose sign-off is required before release. Acceptance criteria are pre-agreed, scope is bounded, and the goal is formal validation against documented requirements.
Beta testing typically follows UAT for product software being shipped to a market (consumer apps, SaaS, mobile). The build is exposed to a wider external audience — sometimes thousands of early adopters — in real-world conditions, to gather usability feedback, surface edge-case bugs at scale, and stress-test infrastructure before general availability. Enterprise software built for an internal customer often skips beta entirely, ending at UAT sign-off.
| Alpha | UAT | Beta | |
|---|---|---|---|
| Testers | Internal staff outside the team | Business users / clients | External users in the market |
| Environment | Internal pre-staging | Production-like staging | Real-world / production |
| Audience size | Tens | Tens to low hundreds | Hundreds to thousands |
| Goal | Catch show-stoppers | Validate business fit | Gather launch feedback at scale |
| Output | Defect log, build readiness call | Formal sign-off | Usability data, scale-bug list |
The phases are sequential when they all run, but plenty of releases skip one or two. A B2B SaaS shipping a new admin feature to an enterprise customer might run UAT and skip beta. A consumer app launching a brand-new product might do alpha and beta but minimal formal UAT. Map the phases to your release context — do not run them because the textbook lists them.
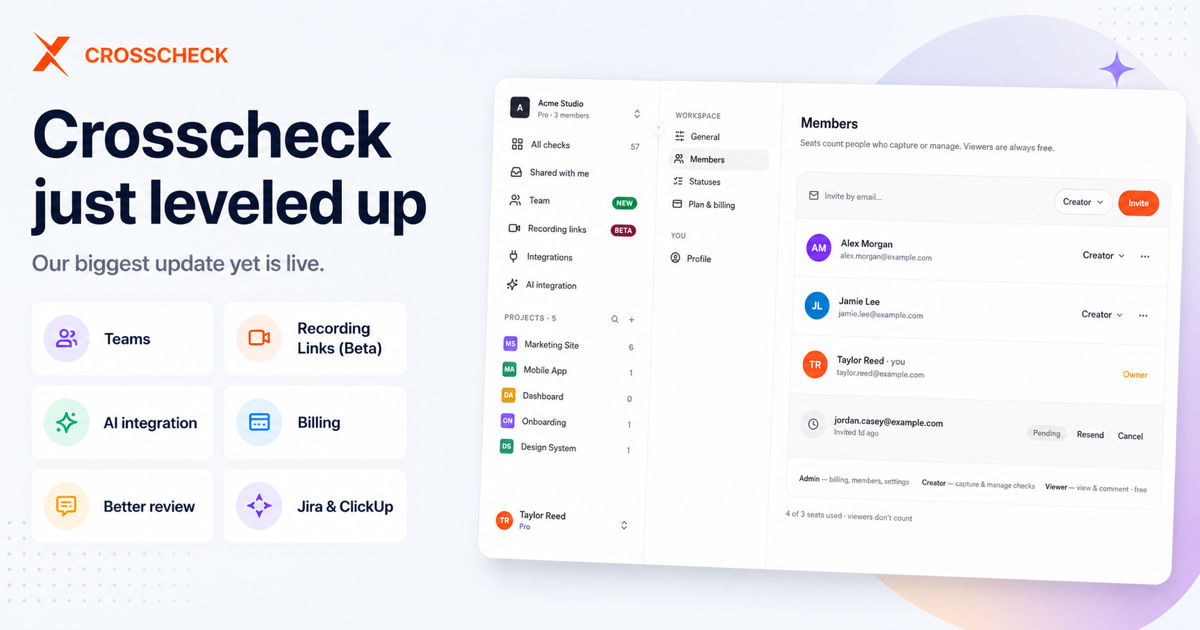
Who runs UAT? Selecting the right participants
UAT participants should be the people who will actually use the software, or those who closely represent them. That sounds obvious. The reason it gets violated so often is that the people closest to the project — developers, QA, project managers — are also the easiest to recruit, and they will say yes when business users say they are too busy.
The right UAT roster typically includes:
- Business owners and product owners who signed off on the requirements at the start of the project. They are the final authority on whether the build matches the brief.
- End users — the people doing the daily work the software supports. For an invoicing module, that is accounts payable staff. For a CRM, it is the sales reps. For a clinical tool, it is the nurses and physicians, not the IT director who bought the system.
- Client representatives when the software is being delivered to an external customer. Their sign-off is contractual, not just procedural.
- Subject matter experts who understand the domain deeply — compliance officers, senior practitioners, integration partners — even if they do not personally use the system daily.
The strongest UAT teams mix experienced power users with newer users. Power users find the workflow and logic problems — the cases where a screen looks fine but the underlying rule is wrong. Newer users find the usability problems the team has gone blind to. Both classes of bug matter and neither group catches the other's.
A QA professional or project manager typically facilitates UAT — coordinates schedules, manages the defect log, runs daily triage — but the actual validation must come from the business side. The facilitator is the operations layer, not the verdict.
The UAT process, step by step
A workable UAT cycle follows a clear sequence. Skipping steps is how teams end up with sign-offs that did not actually verify anything.
1. Analyse business requirements
Re-read the business requirements document, user stories, and acceptance criteria. Identify which workflows are in scope for this release, which user roles need to be represented, and what "done" looks like at the requirement level. Every test case you write later should trace back to at least one requirement — if a scenario cannot be linked to a documented requirement, it is a scope question to resolve before testing begins, not a test case.
2. Define scope and entry criteria
UAT scope expands rapidly if it is not pinned down in writing. Document what is in scope and — equally important — what is not. Then define entry criteria: the conditions that must be true before UAT can start. Common ones include:
- All critical and high-priority QA defects resolved and retested
- UAT environment stable and configured to match production
- Test data prepared, seeded, and sanitised
- All required participants briefed and available
- Sign-off authority and roles confirmed
Without entry criteria, teams routinely begin UAT on an unstable build — wasting participant time and burning credibility with stakeholders the first time a screen crashes on click.
3. Write the UAT test plan
The UAT test plan documents the strategy, schedule, resource assignments, environment details, and exit criteria. It should answer, on a single page if possible: who is testing what, when, in what environment, and what must be true before sign-off is granted.
Exit criteria are the most important section. A typical formulation: all critical and high-severity defects resolved or accepted with documented risk, at least 95% of in-scope test cases passed, no open requirement gaps, and signed acceptance from all named approvers.
4. Build test scenarios and cases
Test scenarios describe real-world situations users will encounter. Test cases define the specific steps, inputs, and expected results. Write both in business language, not system terms. Replace "verify that the API returns 200 on valid POST" with "submit a new customer order and confirm it appears on the order management dashboard within 30 seconds."
The strongest UAT scenarios are role-based and grounded in real workflows. "As an accounts payable clerk, process an invoice from receipt to payment approval the way you would on a typical Tuesday morning, using realistic vendor and amount data." That kind of scenario surfaces issues a step-by-step script never will.
5. Set up the UAT environment
The UAT environment should be a stable, production-like staging environment, fully separated from development and production. Configure all integrations — third-party APIs, authentication providers, email and notification services, payment systems — so that end-to-end workflows can run completely. Use realistic, sanitised test data that reflects production volume and variety. An empty database hides the edge cases that real data exposes within an hour.
6. Brief and onboard testers
Do not assume that business users know how to conduct structured testing. Run a short onboarding session that covers the scope of this UAT cycle, how to access the environment, how to execute and record test results, how to file defects, and how to escalate blockers. Friction in this process costs you thoroughness — every clarification email that does not get sent is a defect that does not get logged.
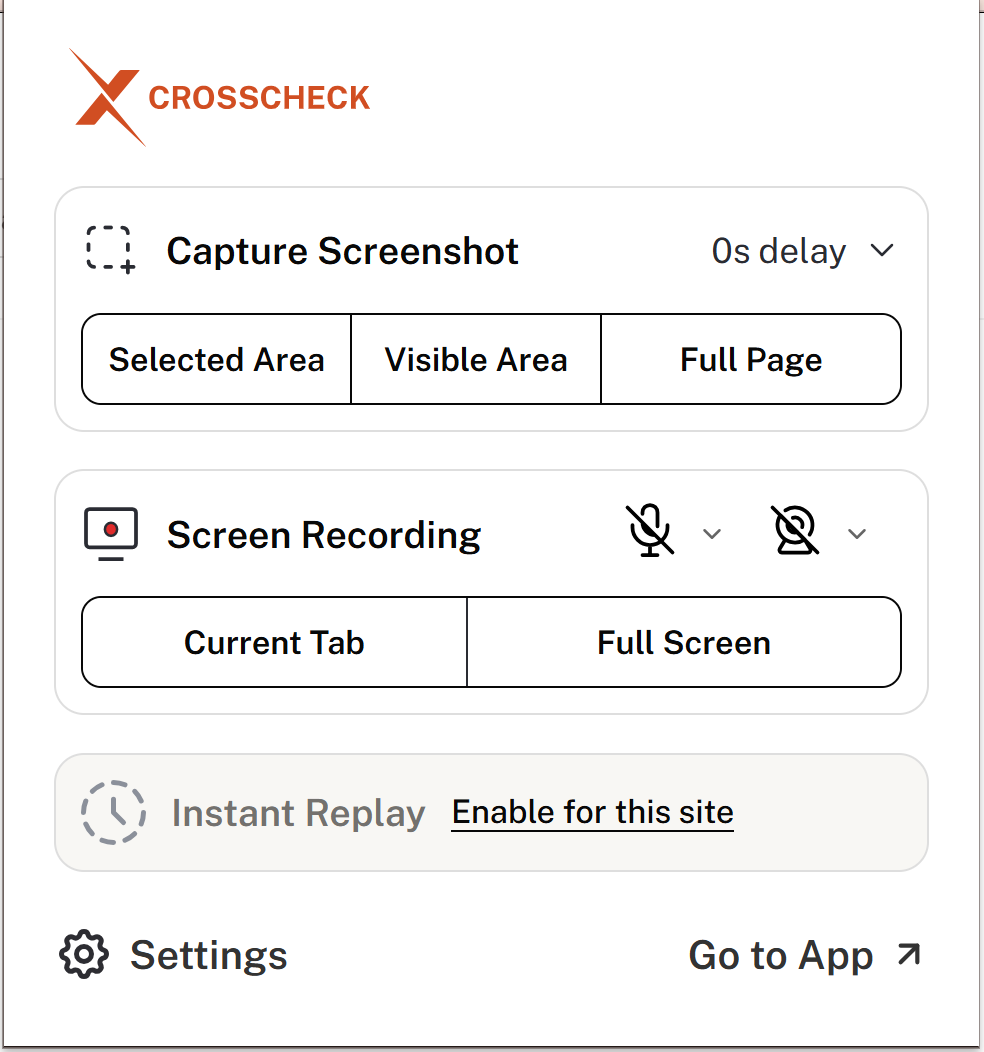
7. Execute testing and capture evidence
Testers work through their assigned scenarios, recording pass or fail for each test case and logging any defects they encounter. This is the stage where bug-report quality determines how fast defects get resolved. A complete UAT defect report includes:
- A clear description — what happened versus what was expected
- The exact steps to reproduce
- Environment details: browser, OS, role, account, data context
- Screenshots or screen recordings as evidence
- Console logs and network requests where available
- Severity and impact on the business workflow
This is also where non-technical testers struggle the most, and where the entire UAT program quietly loses days of throughput. We will come back to it in the best-practices section.
8. Triage defects continuously
Every defect logged during UAT should land in a centralised tracking system — Jira, Linear, ClickUp, whatever the team uses — with a severity level attached. A three-tier classification is usually enough:
- Critical — blocks a core business workflow; must be resolved before go-live
- Major — significantly impacts usability but has a workaround; resolve before go-live or accept with documented risk
- Minor — cosmetic or low-impact; can be deferred to a future release
Hold daily triage during UAT. Defect lists left for a week become unmanageable, and developers blocked on clarification questions burn the schedule from the inside.
9. Retest and run regression checks
As developers ship fixes, those fixes must be retested by the original tester or facilitator to confirm resolution. Run targeted regression checks alongside — fixes have a way of breaking previously passing scenarios, especially in the last week of UAT when the team is moving fast.
10. Obtain sign-off and prepare for go-live
Once exit criteria are met, the named stakeholders formally review the results and grant sign-off in writing. Sign-off is documented evidence that the software has been validated against business requirements and is ready for production.
Close the cycle with a UAT closure report summarising: test execution results, defect counts by severity, resolution status of each, any open issues accepted with risk documentation, and the sign-off record from every required approver. That document survives the project — six months later, when someone asks why a known issue went to production, the closure report is the answer.
UAT in agile and continuous delivery
The textbook UAT cycle assumes a discrete pre-launch event. Most teams in 2026 do not have one. Agile teams ship in two-week sprints; mature DevOps organisations deploy multiple times a day. The question is not whether UAT survives — sign-off requirements have not gone away, particularly for contracted client work and regulated industries — but how it adapts.
Three patterns are working in practice.
Sprint-scoped acceptance. Acceptance testing is folded into each sprint rather than held for the end of the project. Business users or product owners review completed user stories during the sprint review, against the acceptance criteria written at sprint planning. Defects are logged into the next sprint's backlog. This works when the product owner is genuinely empowered to accept on behalf of the business — and falls apart when "the business" turns out to be a committee that has not been in the room.
Feature-flag UAT. New features ship behind a feature flag, enabled for a small group of business testers in the production environment. They run acceptance scenarios on real data with real integrations, and the flag is flipped for broader users only after sign-off. This collapses the distinction between UAT and a controlled beta — and works well when the team has the operational maturity to roll back cleanly if a critical defect surfaces.
Release-train UAT. Multiple sprints worth of work are bundled into a release candidate every four to six weeks, and a compressed UAT pass is run against the candidate before promotion. Common in regulated industries where each production change needs an audit trail and where business users cannot be in the test loop every sprint.
What does not change in any of these models: the requirement for explicit acceptance criteria, named approvers, and documented sign-off. The cadence shifts; the accountability does not.
The non-technical bug report problem
The single most common UAT failure mode is not a process gap — it is a reporting gap. Business users know something is wrong but rarely have the technical vocabulary, screenshotting habit, or DevTools fluency to file a report a developer can act on without a clarification thread.
The developer needs reproduction steps, browser and OS, console errors and network requests at the moment of failure, a screenshot or recording, and the expected behaviour in the tester's words. What the tester typically writes is "the page didn't work." That gap is where UAT throughput goes to die — developers ping back for clarification, the tester replies a day later having lost the context, the defect lingers in triage. Multiply that by 40 bugs across a two-week cycle and sign-off slips by a week.
The fix is to remove technical reporting work from the tester's job entirely. The tester describes what went wrong in their own words; the tool captures everything technical in the background and attaches it to the report. The developer gets a complete report and the tester never had to know what a console log is.
This is the specific gap Crosscheck is built for. It is a free Chrome extension for visual bug reporting. A UAT tester clicks the extension when they hit a bug, captures a screenshot or screen recording, and adds a short description. Crosscheck attaches the console logs, network requests, browser and OS metadata, and a replayable trace of the user's actions, then sends the complete report straight into Jira, Linear, ClickUp, GitHub, or Slack. The handoff that used to take a week happens in three minutes. For the format developers actually want, the perfect bug report template covers what to put in each section.
A minimal UAT plan and bug-report template
Most UAT plans get over-engineered. A workable plan template fits on two pages and covers seven sections:
PROJECT / RELEASE / UAT WINDOW / FACILITATOR / APPROVERS

SCOPE             In scope / Out of scope (explicit)

ENTRY CRITERIA    QA defects cleared, environment verified,
                  test data seeded, participants briefed

PARTICIPANTS      Name — role — scenarios assigned

TEST SCENARIOS    Scenario — owner — acceptance criterion

DEFECTS           Tool, severity tiers, daily triage time

EXIT CRITERIA     95% pass rate, zero open criticals, all
                  approvers signed off, closure report drafted
Pair the plan with a defect template testers can complete in two minutes — title, severity, scenario, what happened, what was expected, steps to reproduce, environment, evidence, impact. Everything in the environment and evidence sections (browser, OS, console logs, network requests, recording) should be auto-captured by the reporting tool, not typed by the tester. Anything you take off the tester's plate gets reported consistently and every time.
Common UAT failure patterns
Even well-planned UAT cycles hit predictable failure modes. Knowing them in advance makes them manageable.
Wrong testers selected. IT staff or QA engineers in place of actual business users. Sign-off is granted, but the validation that was supposed to happen never did.
Ambiguous requirements surface late. UAT becomes the venue for re-litigating the requirements. Disputes about whether observed behaviour is a bug or the spec slow sign-off and frustrate everyone.
Environment instability. Missing data, broken integrations, or staging that does not match production — UAT findings cannot be trusted under those conditions, and you will not know which defects are real until production goes live.
Time pressure compresses the cycle. Schedule slippage earlier in the project eats UAT first. Teams under deadline pressure cut corners, skip scenarios, and sign off on builds that were not truly ready.
Tool complexity reduces participation. Asking business users to learn a test management platform or fill spreadsheets manually is the fastest way to lose them. The simpler the testing and reporting interface, the more thorough the testing.
Bug-report quality collapses. Vague reports trigger clarification threads, clarification threads delay resolution, and the defect backlog grows. As above — the highest-leverage place to invest in any UAT program.
Sign-off treated as a conversation. "It seems fine" is not sign-off. Without explicit exit criteria checked against test results, the team has no defensible position when something breaks in production a week later.
FAQ
Who is responsible for UAT?
UAT execution is owned by business users or client representatives — the people who will use the software or whose sign-off is required. UAT coordination — scheduling, defect tracking, daily triage — is typically owned by a QA lead or project manager. The validation itself must come from the business side; if QA staff are running the tests on behalf of the business, the phase is QA testing, not UAT.
How long should UAT take?
For most enterprise releases, UAT runs one to three weeks. Smaller sprint-scoped acceptance can be a single day. The cycle length should be driven by the scenario count and tester capacity — not by what the project plan said six months ago. A common mistake is treating the planned UAT window as a hard ceiling even when scope expanded mid-project.
Does UAT still apply in continuous deployment?
Yes — but the format adapts. Continuous-deployment teams typically replace a single pre-launch UAT event with sprint-scoped acceptance, feature-flag UAT, or release-train UAT. The cadence changes; the requirement for explicit acceptance criteria and documented sign-off does not. Regulated industries and contracted client work still demand a formal UAT artefact regardless of delivery model.
What is the difference between UAT and system testing?
System testing is performed by the QA team against the assembled system to verify it meets functional and technical specifications. UAT is performed by business users against business requirements to verify the system is fit for use. System testing checks the build; UAT checks the fit.
Can UAT be automated?
Parts can be. Repeated acceptance scenarios in long-lived products are often automated as acceptance tests in CI — particularly in BDD frameworks like Cucumber, where scenarios are written in plain language by the business. What cannot be automated is the human judgement of whether the system supports the business workflow, which is the core of UAT. Treat automation as a way to free up tester time for exploration, not as a replacement for the validation itself.
What happens if UAT fails?
Failure means the exit criteria were not met. The release does not go to production until either the blocking defects are resolved or the business approvers accept the open issues with documented risk and sign off explicitly on that basis. Going live anyway without recorded acceptance is how teams end up explaining a production incident to a regulator or an angry customer.
Start running UAT cycles that actually validate
UAT is the stage where the software gets judged against the business that will use it. The step-by-step process in this guide — clear requirements, defined scope, written test cases, a stable environment, trained testers, structured defect reporting, explicit sign-off — is the foundation. The execution quality depends on removing friction at every stage, and especially on the non-technical business users doing the most important validation.
If your UAT cycles slow down because business testers cannot describe bugs in a form developers can act on, that is the gap Crosscheck was built to close. It gives UAT testers one-click bug capture with automatic console logs, network requests, screen recordings, and reproducible action traces, then sends the complete report straight into Jira, Linear, ClickUp, GitHub, or Slack. Every bug that reaches your developers arrives with the context they need to fix it. No clarification thread, no week-long ping-pong.
Try Crosscheck free — install the extension and use it on your next UAT cycle.