Create Your First Check
Crosscheck offers three ways to capture a bug, each suited to a different situation. This guide walks you through creating your first check with each mode so you can choose the right one when it counts.
Check types at a glance
| Type | Best for | Output |
|---|---|---|
| Screenshot | Static UI bugs, layout issues, visual regressions | Annotatable PNG image |
| Screen Recording | Multi-step bugs, interaction flows, animations | Trimmed video (WebM/MP4) |
| Instant Replay | Unexpected bugs you did not plan to record | Lightweight DOM session replay |
Taking a screenshot
Screenshots are the quickest check type. You can capture the visible area, the full page, or a selected area of the screen. An optional capture delay (0, 3, or 5 seconds) lets you set up the exact state before the screenshot is taken. The annotation editor then opens where you can highlight the issue with arrows, text, shapes, and blur tools before saving.
Navigate to the page with the bug
Open the web page you are testing in Chrome. Make sure the issue is visible on screen.
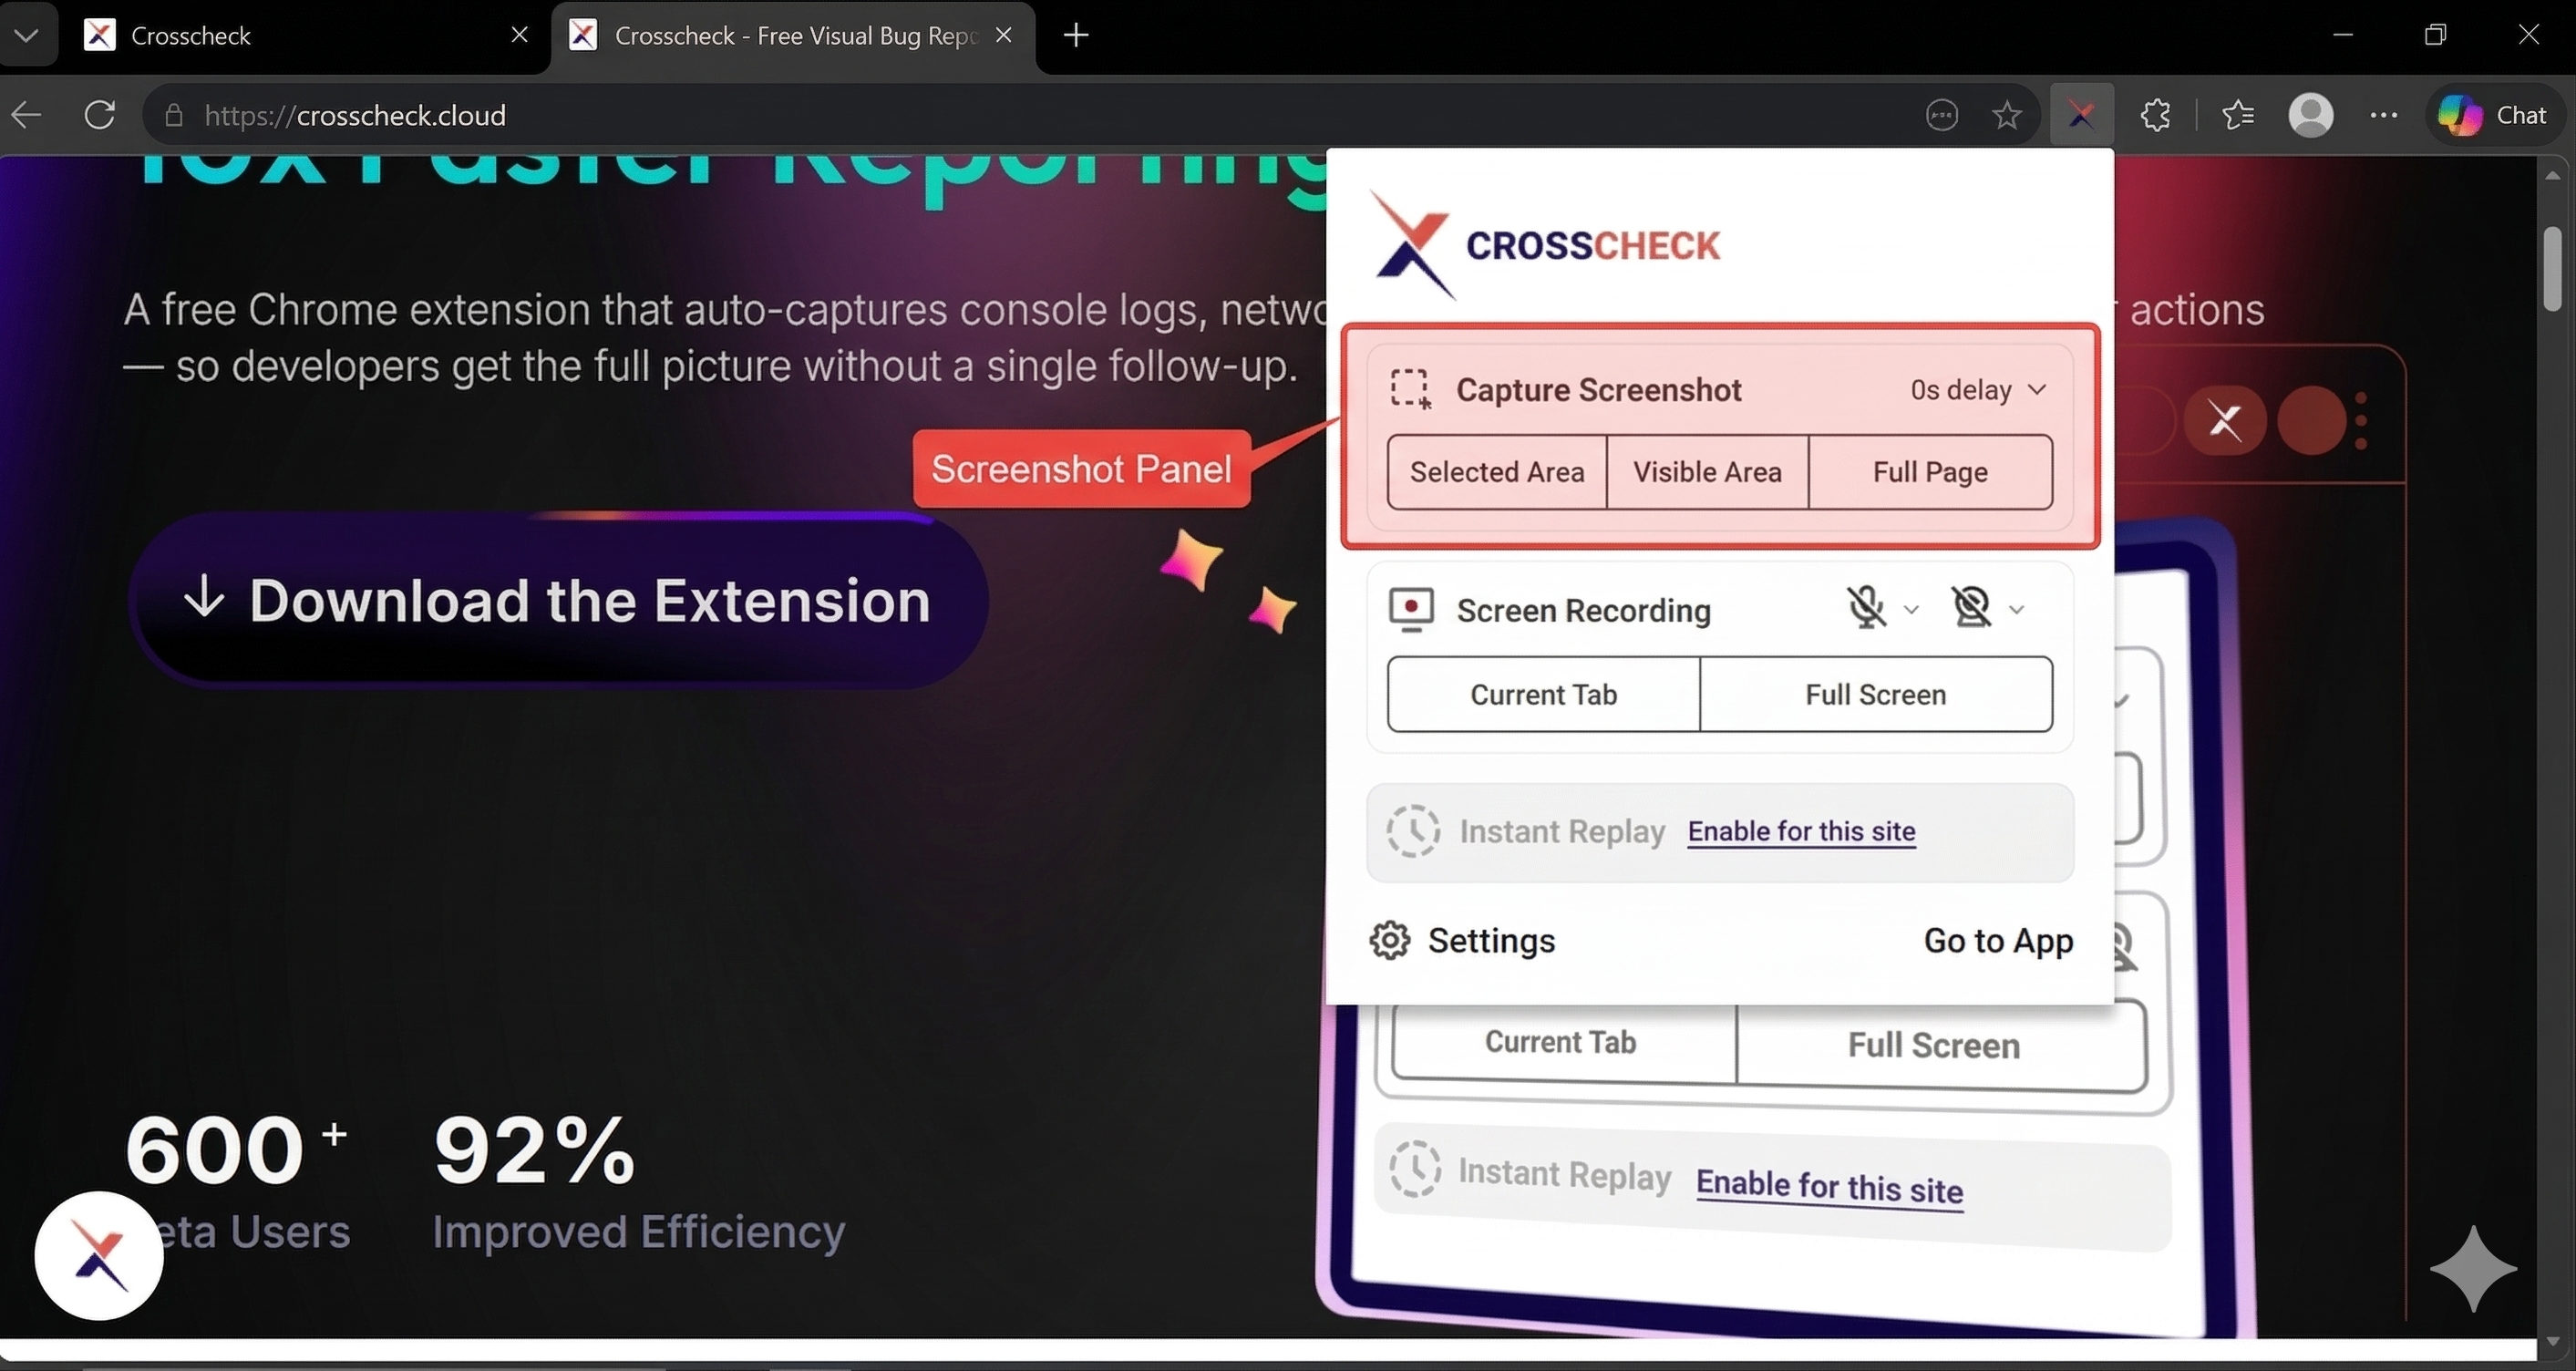
Open Crosscheck and pick a screenshot mode
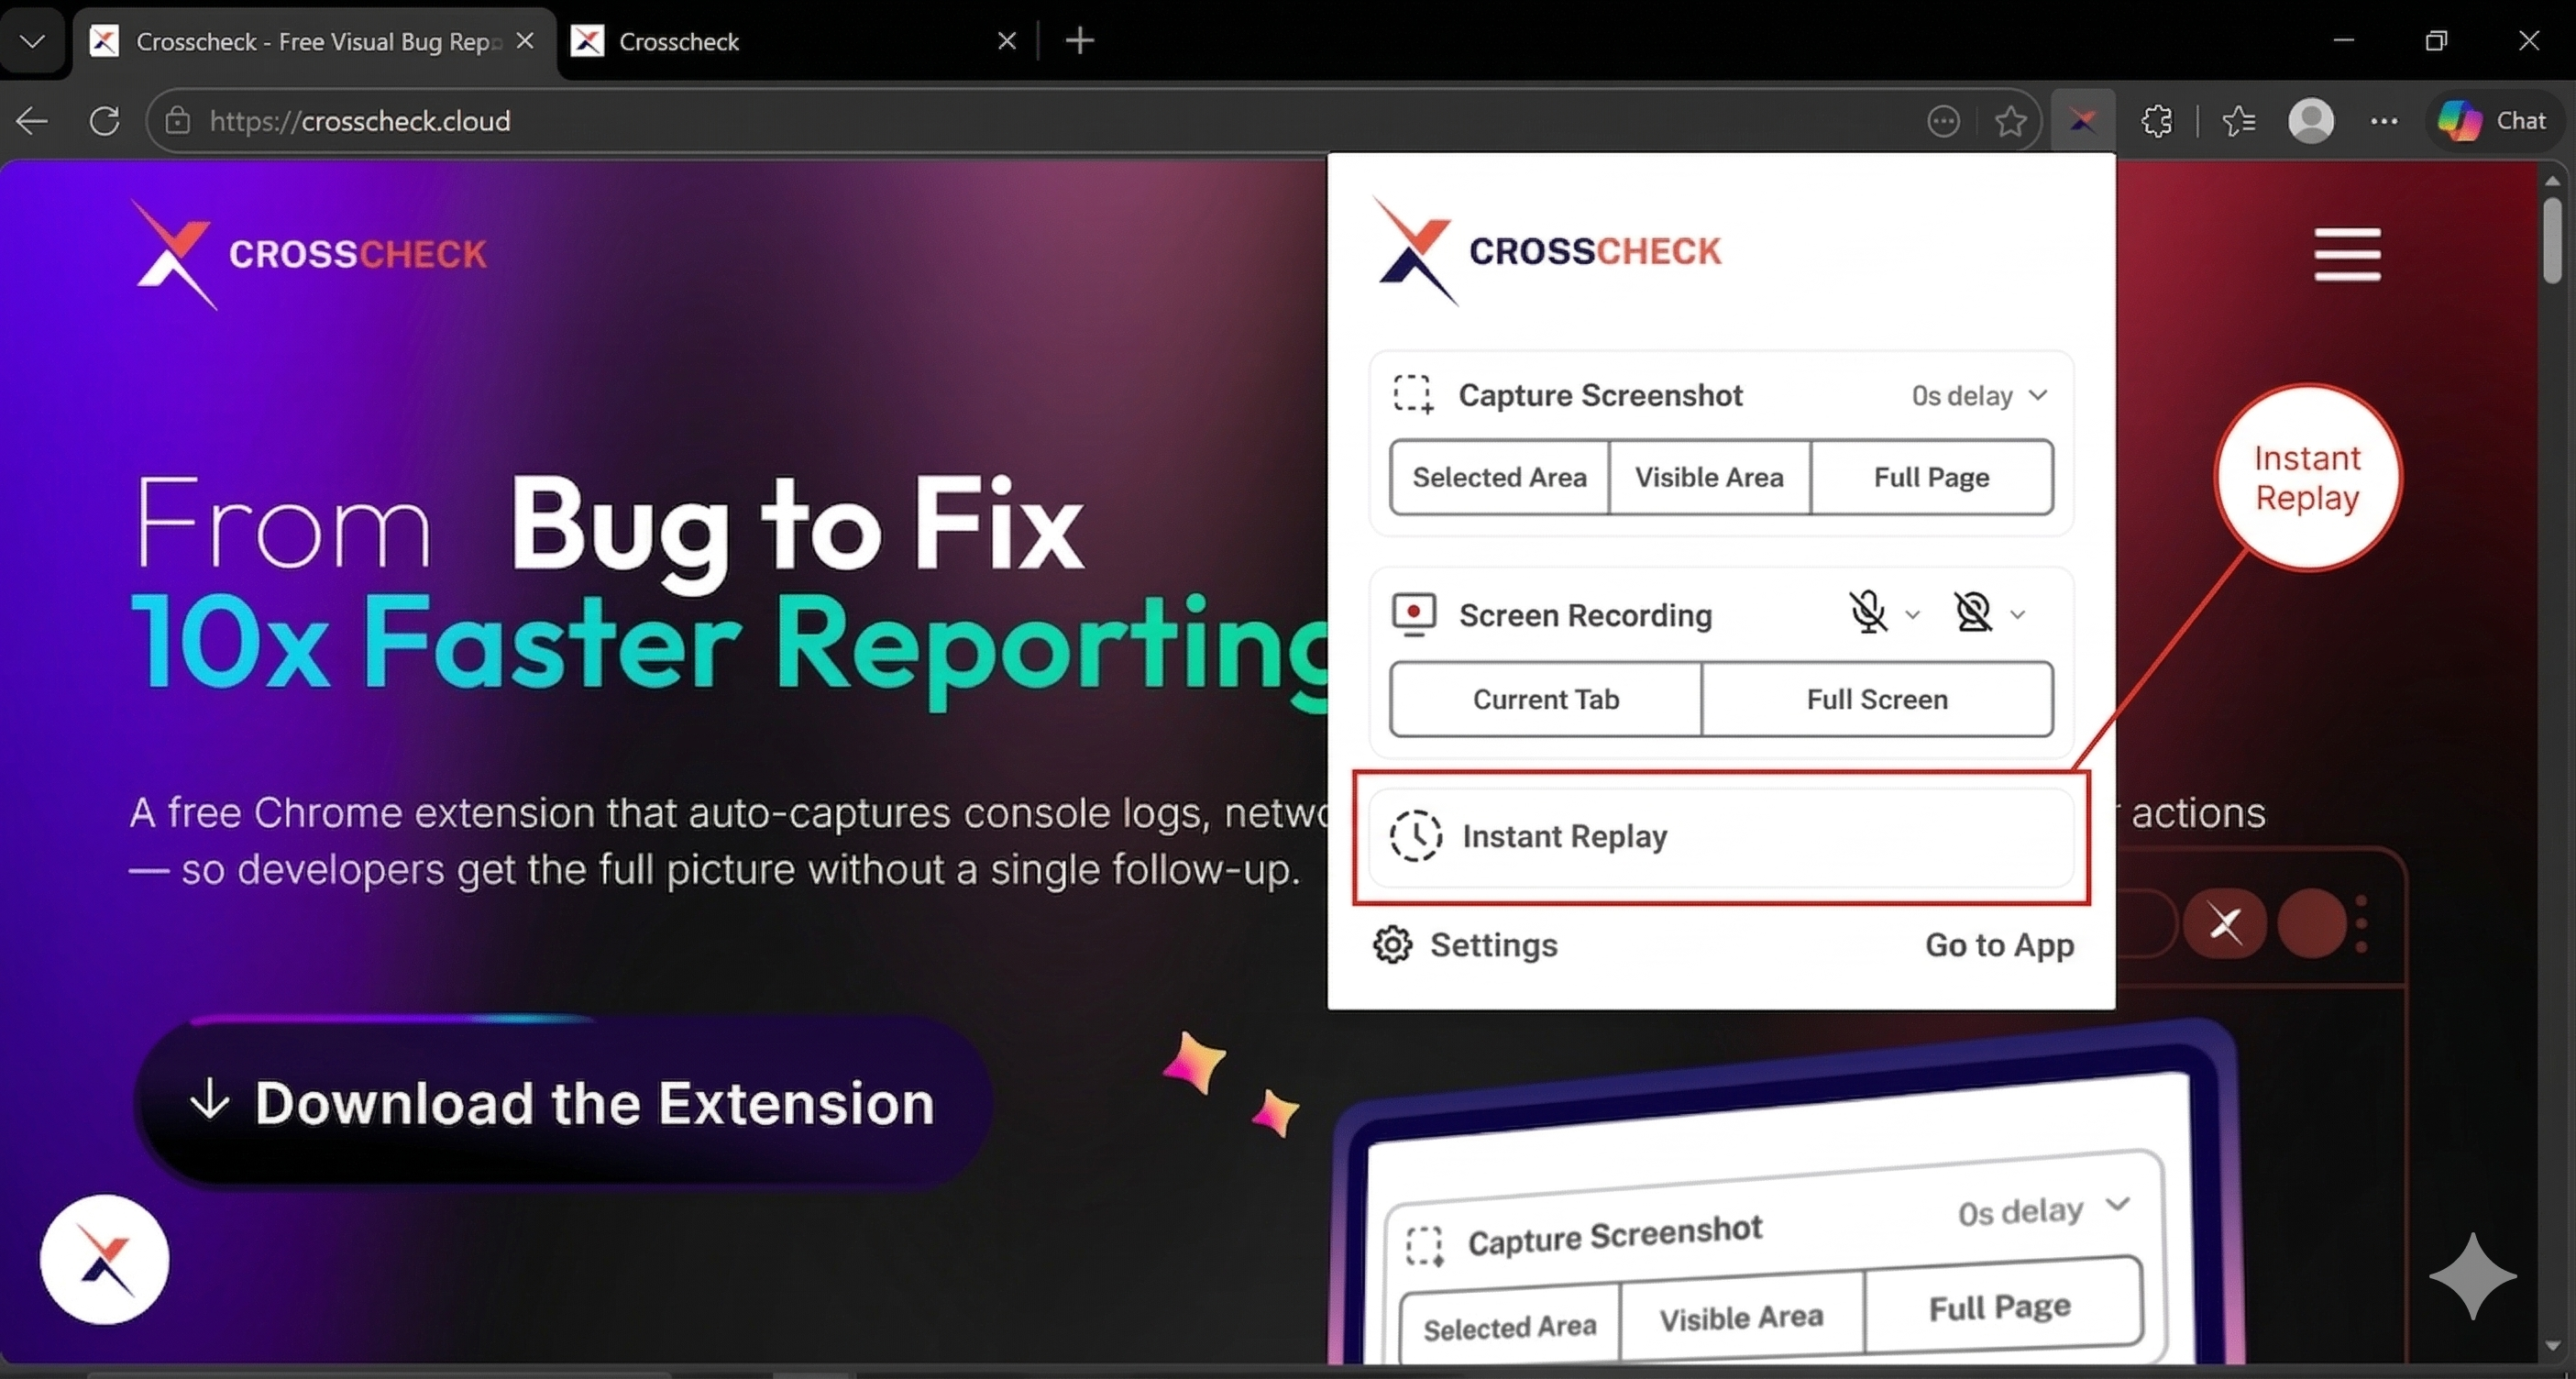
Click the Crosscheck icon in your toolbar to open the extension popup. Under the Capture Screenshot heading, the three modes are shown by default — pick the one that fits your bug:
- Selected Area — Click and drag to capture a specific region of the page.
- Visible Area — Capture exactly what is visible in the current browser tab.
- Full Page — Capture the entire scrollable page from top to bottom, stitched into a single image.
You can also set a capture delay before the screenshot is taken — useful if you need a moment to open a menu, trigger a hover state, or set up the page. The delay defaults to 0s, and you can switch it to 3s or 5s.
Annotate the check
A preview of the screenshot opens with an annotation toolbar at the top. From left to right, the toolbar gives you:
- Color picker — Choose the color for any annotation you draw next.
- Pen — Draw freehand on the screenshot.
- Rectangle — Draw a rectangle to box off an area.
- Ellipse — Draw a circle or ellipse to highlight a region.
- Arrow — Point at a specific element to draw attention to it.
- Line — Draw a straight line for callouts or measurements.
- Focus / spotlight — Dim everything except the area you want the viewer to see.
- Blur — Pixelate sensitive information like emails, names, or tokens before sharing.
- Hand / move — Pan around the screenshot without drawing.
- Undo & Redo — Step back or forward through your annotation history.
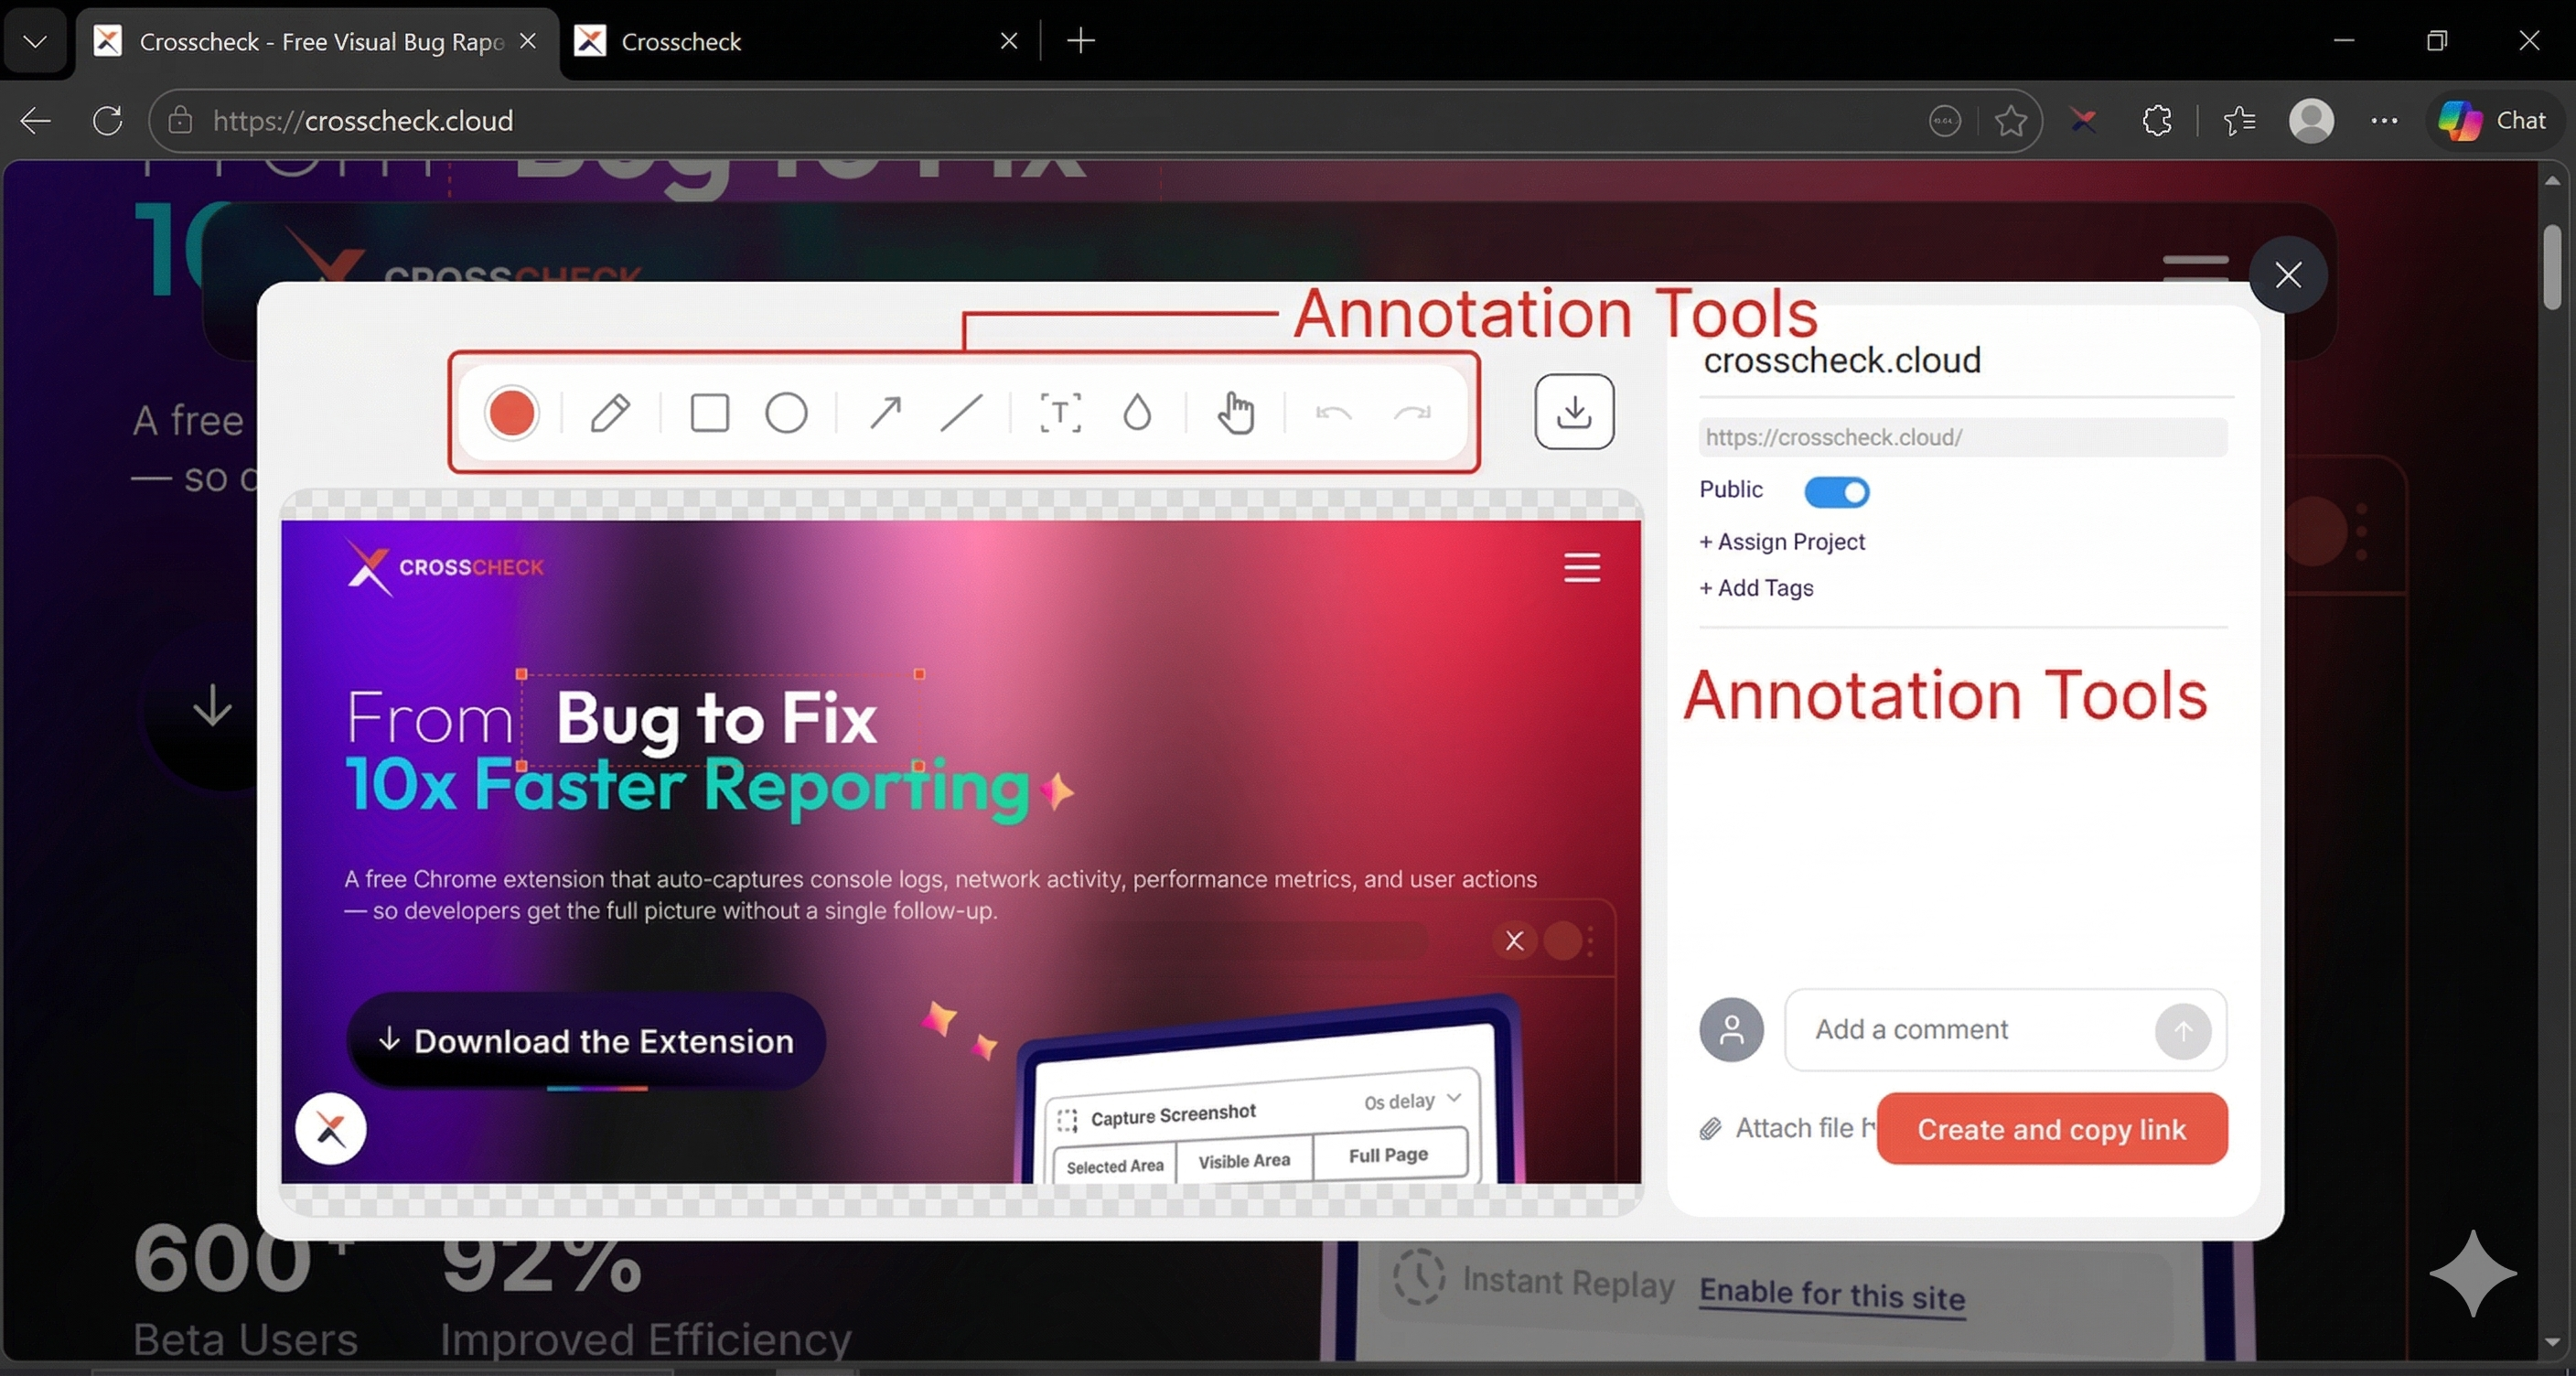
Create and copy link
Use the preview side panel to set visibility (public or private), assign a project, add tags, and leave a comment. When everything looks right, click Create and copy link. The final check opens in a new tab so you can review or share it immediately, and it is automatically saved to your Crosscheck dashboard at app.crosscheck.cloud — under your selected project, or under All Checks if none was chosen.
Creating a screen recording
Screen recordings capture video of the current tab or your full screen. They are ideal for bugs that involve multiple steps, hover states, animations, or timing-dependent behavior. You can enable microphone audio and a camera overlay to narrate and personalize your recordings. After capturing, trim the recording to keep only the relevant portion.
Open Crosscheck and pick a recording mode
Click the Crosscheck icon to open the extension popup. Under the Screen Recording section, you will see two options:
- Current Tab — Records only the active browser tab. Best for web app bugs.
- Full Screen — Records your entire screen or a selected window. Useful when the bug spans multiple windows or applications.
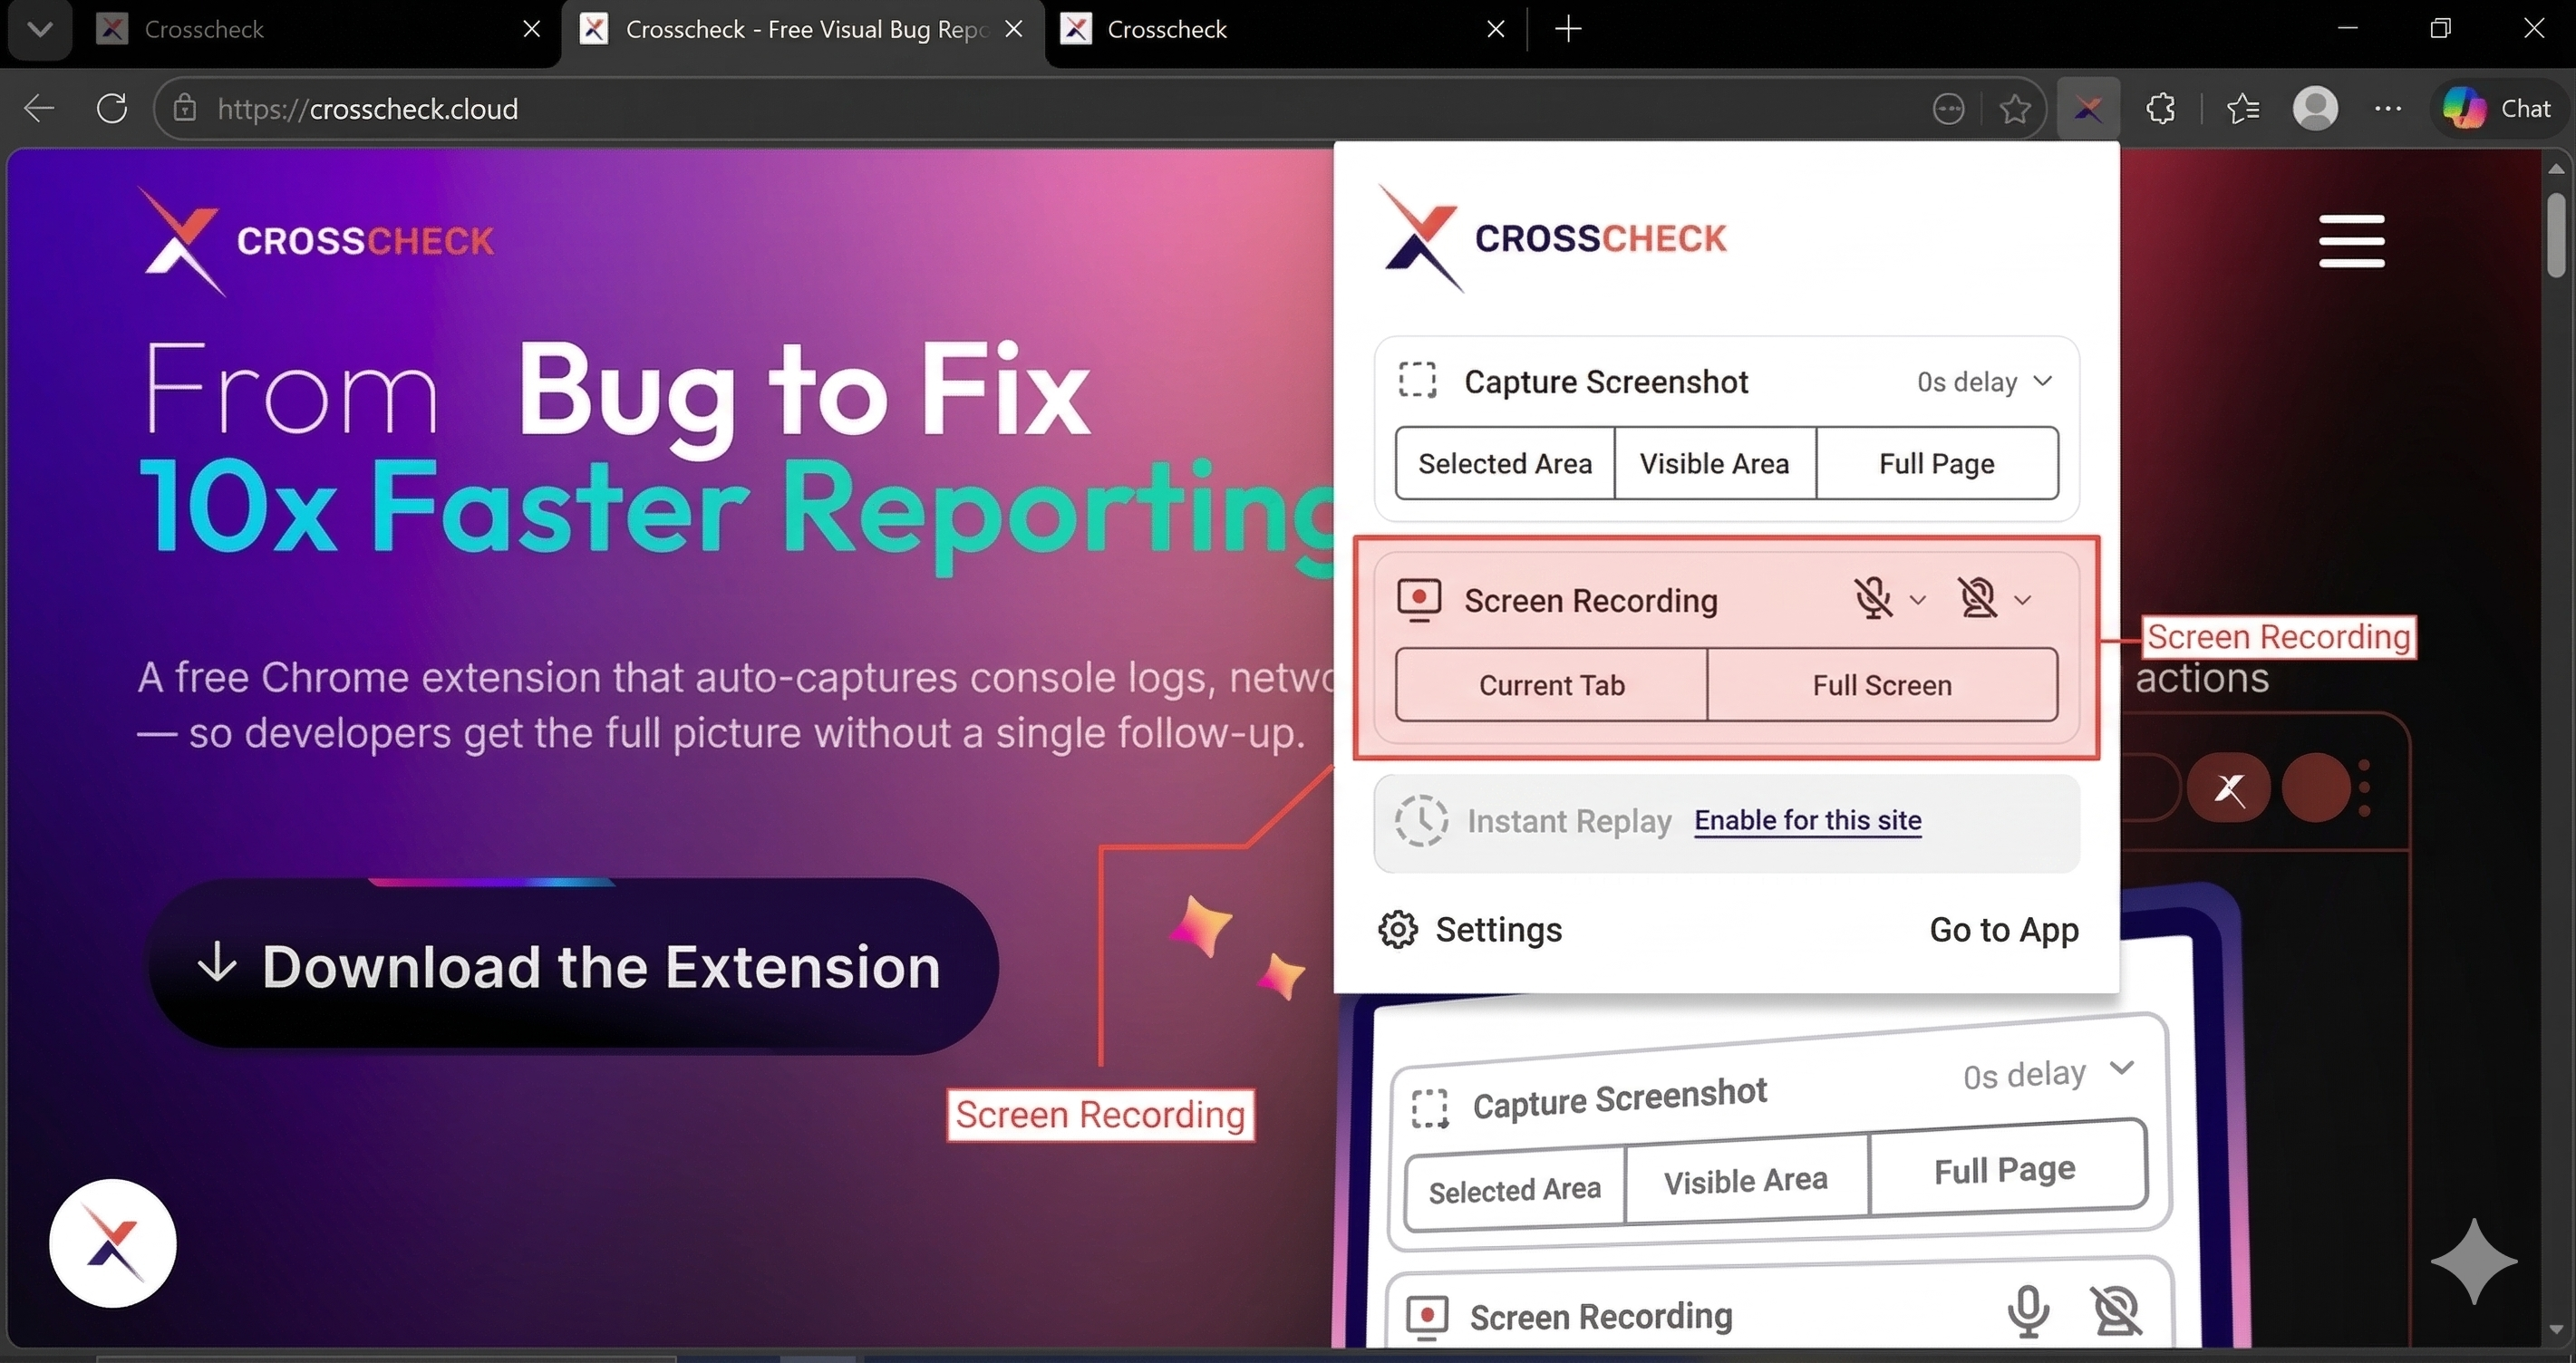
Configure mic and camera
Before starting the recording, use the microphone and camera icons in the same section to enable or disable audio and webcam overlay. Click the dropdown chevron next to each icon to pick a specific input device — for example, switch between your built-in mic and a headset, or between your webcam and an external camera.
Record and reproduce the bug
Once you start the recording, a floating control toolbar appears with a live timer. From the toolbar you can:
- Stop — End the recording and move to the trim step.
- Pause / Resume — Pause mid-recording and pick up where you left off.
- Annotate — Draw on the screen during the recording to highlight what is happening.
- Mic and camera — Toggle the microphone or webcam on or off mid-recording, or use the chevrons to switch input devices on the fly.
Reproduce the bug as you normally would — every interaction is captured along with the matching console logs and network activity.
Stop and trim
Click the Stop icon on the floating toolbar to end the recording. A trim interface appears where you can drag the start and end handles to keep only the portion of the video that shows the bug. This keeps uploads small and focused.
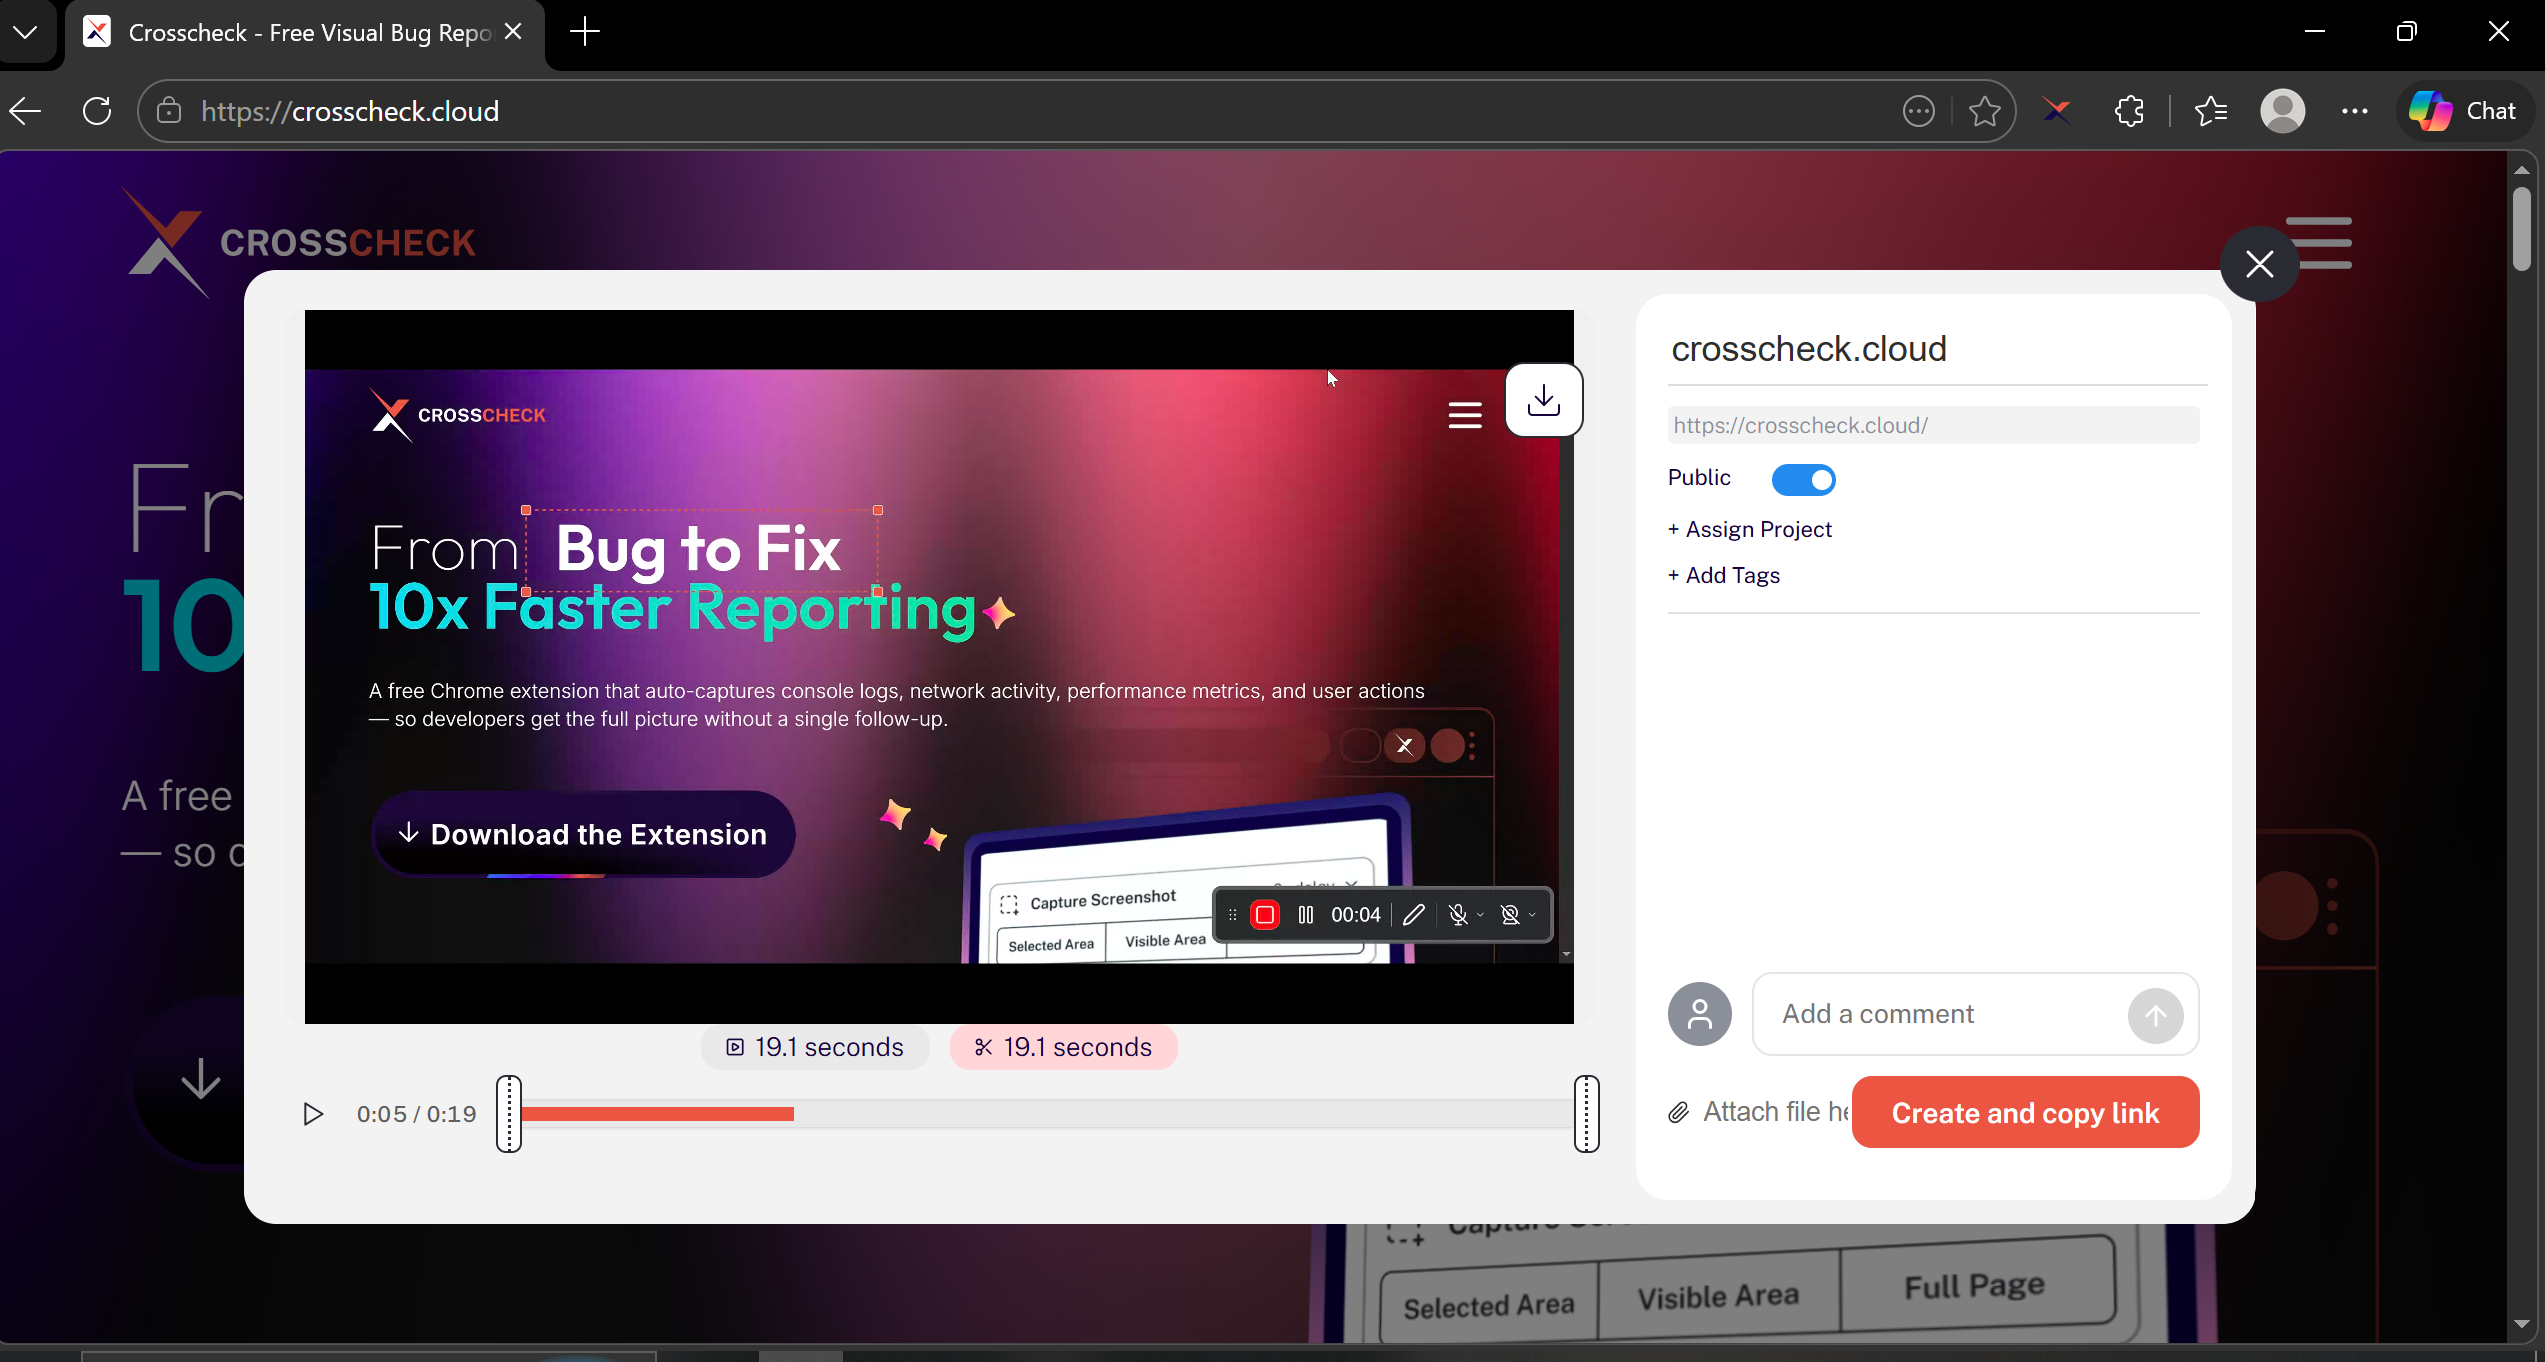
Create and copy link
Click Create and copy link to finalize the recording. The trimmed video uploads along with the synchronized developer context — console logs and network requests are automatically remapped to the trimmed timeline. The final check opens in a new tab and is automatically saved to your Crosscheck dashboard at app.crosscheck.cloud, under the project you assigned in the preview side panel, or under All Checks if none was chosen.
Using Instant Replay
Instant Replay is designed for the bugs you do not expect. Once enabled for a site, Crosscheck continuously records page activity in the background using lightweight session recording technology. When something goes wrong, you can grab the last 1 to 5 minutes as a replay — even though you never pressed "record."
Enable Instant Replay for the site you're testing
Instant Replay only runs on sites you have explicitly enabled, so it never records pages you have not opted in to. There are two ways to add a site:
- From the extension popup — Open the site you want to test, click the Crosscheck icon in your toolbar, and toggle Enable Instant Replay for this site. The current site is added to your replay list automatically and Crosscheck starts buffering activity right away.
- From extension settings — Open Settings → Enabled Replay Websites and add the site URL manually. This is useful when you want to pre-configure multiple sites in one place.
From the same settings panel you can also adjust the buffer duration (between 1 and 5 minutes) and enable or disable Instant Replay globally.
Encounter a bug
Continue testing normally. When you see an issue you want to report, open the Crosscheck extension.
Capture the replay
Click Instant Replay in the extension popup. Crosscheck exports the buffered DOM recording as a session replay, along with the matching developer context.
Preview, trim, and create the check
The captured replay opens in a preview window where you can scrub through the session, trim the start and end to isolate the relevant moments, and configure the side panel (visibility, project, tags, and comment). When everything looks right, click Create and copy link — the check is saved to your Crosscheck dashboard at app.crosscheck.cloud and opens in a new tab for review or sharing.
If you close the replay preview without creating the check, your check is not lost. The next time you open the extension popup, the pending replay is shown with two options:
- Create Check — Reopens the preview so you can finish trimming and save the check to your dashboard.
- Delete Check — Discards the pending replay permanently. Use this if the check is no longer needed.